Pages

Saturday, 22 February 2014

Shopping in Bath

Having spent much of last year travelling around England and Wales for work, I've really developed a love for visiting different places, and last weekend I did just that!


On Saturday my mum and I decided to make a day of it and visit the city of Bath, South West England. As it's relatively close to where I live, I've been a couple of times before, although I'd forgotten just how nice a city it really is!


Home to quaint Georgian buildings and a lovely selection of my favourite high street shops, such as Urban Outfitters, Newlook and Topshop as well as smaller Boutiques, Restaurants, Caffe's and specialist independent and designer shops such as Cath Kidston, Rossiters and Jo Malone. Bath really does have something for everyone and as the city centre itself is fairly small, all the shops are close by and easily walkable, meaning you have extra time to shop!


The first shop we visited, was one of my favourite clothes stores...H&M, where I managed to pick up a lovely top, jumper, pair of jeans and a few accessories.  I also bought a playsuit I'd had my eye on in Topshop and a little bag in the sale.  Rather than show what I bought here, I thought I would do a shopping haul, as a seperate blog post.


We could have chosen a nicer day to go, what with the horrendous weather we have recently been experiencing in England.  Especially in Somerset, where weeks of wind and rain, have resulted in a multitude of problems, including severe flooding!  Luckily for us, although a little dismal, the weather did seem to hold off, for the majority  of the day, with only a few showers here and there.


When ever I visit a different city, I always like to try and find somewhere new to eat, that I don't have the luxury of having in my own town.  On this occasion, my mum and I decided to try Carluccios, a lovely modern restaurant, serving authentic Italian food, which changes depending on the season!


The restaurant was lovely and bright, and was nicely decorated with a real Italian vibe. The true sign of a good restaurant is one that is busy and this one certainly was, so I'd recommend booking a table in advance if you were to visit.  Just by chance as we arrived, a cosy little table tucked away in the corner had just become free, so we were fortunate enough not to have to wait.


There was a nice selection of different dishes on the menu, but unlike most Italian's, Pizza was not one of them!  My mum and I both opted for the seasonal special risotto.  Mum chose the seafood one, while I went for the chicken and spinach, I've got to say although they don't look like the most appetising dish they tasted delicious.


Within the restaurant was also a Deli and Food shop selling a variety of products sourced from specialist producers all over Italy, allowing you to take a little bit of Italy home with you.


I thought the meringues looked amazing!


After lunch we popped in to Cath Kidston which was just around the corner and it had to be one of the nicest Cath Kidston stores I've been in!


The upstairs was a beautiful shabby chic room, with white painted wooden floors and exposed brick walls, stocking everything from bedding, pyjamas, & makeup bags through to bathroom accessories and cosmetics all laid out perfectly.  Downstairs displayed handbags, purses, crockery, cutlery and a kids section.

I really had to restrain myself from buying the whole shop...but left feeling quite content with a beautiful wash bag and keyring, carefully wrapped in tissue paper and topped off with a signature bow!


As we strolled back down the street, we clocked eyes on the notorious Jo Malone shop and just couldn't pass up on the opportunity to pop in and sample some of their luxurious perfumes.  I'd never actually been in a Jo Malone shop before, but had heard so many good things about it.  The fragrances are quite unusual and definitely an acquired taste, but I really did enjoy having a browse. I'd definitely recommend popping in if you ever have the chance, however I don't think I could quite bring myself to splash out that much money, unless it was for a very special occasion.


Eventually we decided we should start to make our way back home, but had just enough time to pop into Waitrose and pick up a freshly baked Pecan Danish Swirl from their in store Patisserie.

 I am wearing: Jumper - H&M, Leggings - Zara, Scarf - Primark, Coat - Newlook, Boots - Newlook, Bag - Topshop.


I had such a good day, the nicest I've had in a long time and although I didn't have time to look in all of the shops, it just goes to show that you don't have to spend masses of money to have a great time!


Tuesday, 11 February 2014

Valentine's Day Nail Art


So, it’s been a little while since my last blog post and with Valentine’s Day just around the corner, I thought it was the perfect opportunity to do a tutorial for the valentine inspired nail art I posted on Instagram(@CarolinaCornell).     


I guess I could say, I am somewhat addicted to buying sparkly new nail varnishes. When it comes to painting my nails, I love to experiment with all kinds of colours, patterns and effects - from high gloss brights, glistening glitters through to cool pastels and nudes, I just love them all and have acquired quite a collection over the past few years. I just love how a simple sweep of colour, or a more intricate design can create a real style statement and add a pop of colour to even the most ordinary of outfits.


For this design you will need a selection of 4-5 colours, a striper pen, a dotting tool and/or a cocktail stick.

Starting from left to right, I used the following:

Barry M Gelly High Shine Nail Paint - in Pomegranate (A deep glossy pink)
Essie - Fiji (A lovely, very pale pink)
Barry M Gelly High Shine Nail Paint - in Grapefruit (A bright corally pink)
Maybeline Express Finish 40 - clear base coat
Sinful Colours in Rise and Shine (A deep forest green with a slight shimmer running through it)
Barry M Instant Nail Effects -  in Gold Foil
A gold striper pen (From Primark)


To create this design start by painting all of your nails with a clear base coat.  This helps to protect your nails and minimise staining.


Next choose a pale base colour and apply 2 coats to all of your nails. Make sure to wait a few minutes until they have dried completely, before moving on to the next step. I chose to use a pale pink by Essie in the colour Fiji.  I found that using a pale colour, really helped to make the design stand out and appear more vibrant.


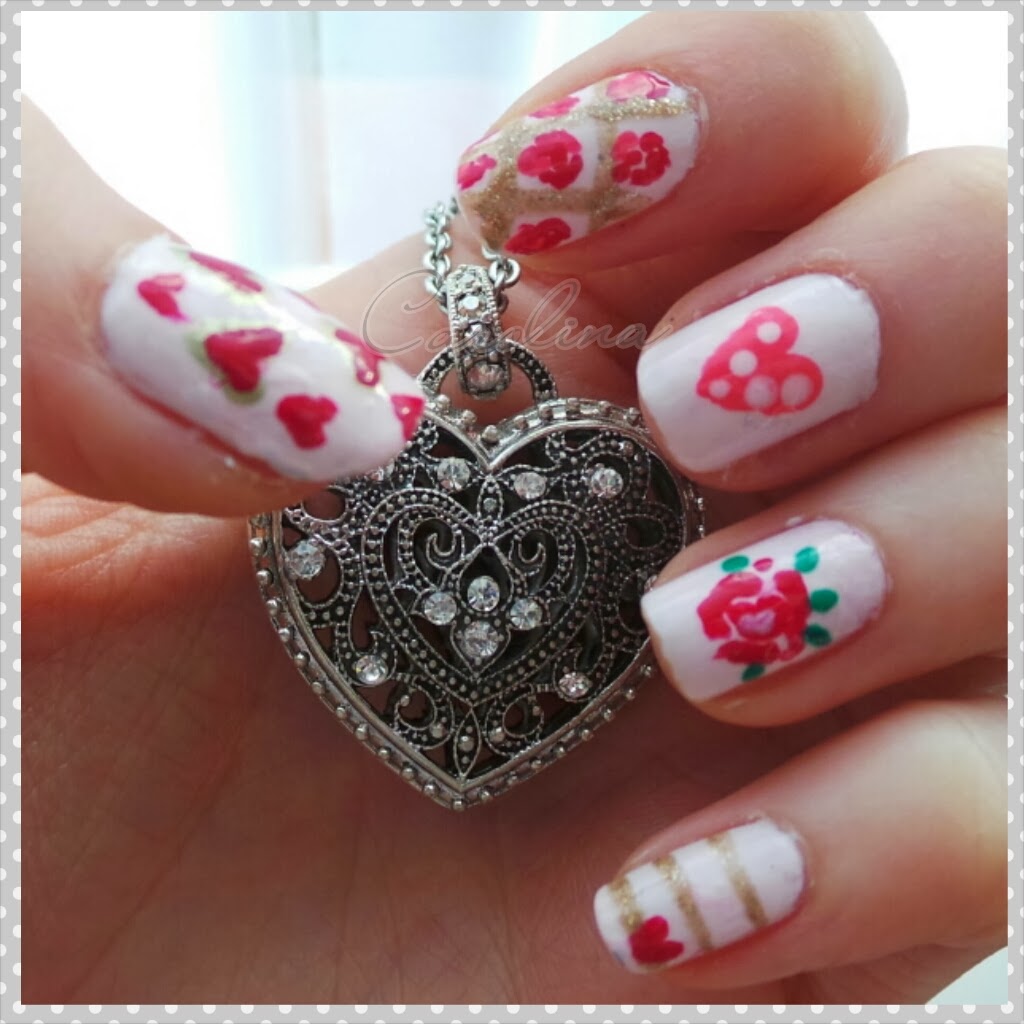
This next step is where all the fun begins! Use a medium sized dotting tool and a gold nail polish to create two small dots on your thumb nail. Drag the dots in a downward motion and at a slight diagonal, until they meet in the middle to form a heart shape. Once this has dried, you can then use the same technique to create smaller pink hearts inside and in any spaces in between. (Whilst I waited for the gold to dry, I moved on to the other nails and came back to the thumb at the end).

 (Excuse the nail varnish on my fingers...it can get a bit messy   at times!)


On your pointer finger, use a gold striper to paint 4 diagonal lines (2 in one direction and 2 in the other, as illustrated above). Next use a cocktail stick dipped into a colour of your choice, to create small roses. I used Barry M's pomegranate and grapefruit to draw alternating small curved lines, forming little roses in between the gold lines. 


On Your middle finger, create one large pink heart in the centre of the nail, using the same technique as that used for the thumb nail(Make 2 dots and drag them down to meet in the middle. The colour I chose to use for the heart was Barry M - Grapefruit. Once the heart has dried you can either leave it plain, or get even more creative and fill the space inside with a pattern. I used a dotting tool to add a few polka dots and create a more eye catching design.


For the ring finger I created a single large rose, using Barry M- Pomegranate. To do this start in the centre of the nail and paint a small,curved line. Following this paint several more curved lines around the centre line. This doesn't have to be too neat, as any irregularities makes for more realistic looking petals. 


Finally finish this nail with a scattering of green leaves, painted around the rose. I used Sinful Colours - Rise and Shine.


For the final nail design on your 'pinkie' finger use a striper in the colour of your choice. I used a gold one from Primark, to create 3 horizontal lines.  


Finish this off with a little heart in the corner of the 3rd line, again using the same technique as mentioned previously.  


And that's it a cute and pretty design, perfect for Valentines day!  

I hope you enjoyed reading this post and if anyone does decide to have a go, I would love to see your recreations! Feel free to leave a link below or use the tag #carolinanails1 on instagram. 
Bye for now xx