So, it’s been a little while since my last blog post and
with Valentine’s Day just around the corner, I thought it was the perfect
opportunity to do a tutorial for the valentine inspired nail art I posted on
Instagram(@CarolinaCornell).

I guess I could say, I am somewhat addicted to buying sparkly
new nail varnishes. When it comes to painting my nails, I love to experiment
with all kinds of colours, patterns and effects - from high gloss brights,
glistening glitters through to cool pastels and nudes, I just love them all and
have acquired quite a collection over the past few years. I just love how a simple sweep of colour, or
a more intricate design can create a real style statement and add a pop of
colour to even the most ordinary of outfits.

For this design you will need a selection of 4-5 colours, a striper pen, a dotting tool and/or a cocktail stick.
Starting from left to right, I used the following:
Barry M Gelly High Shine Nail Paint - in Pomegranate (A deep
glossy pink)
Essie - Fiji (A lovely, very pale pink)
Barry M Gelly High Shine Nail Paint - in Grapefruit (A
bright corally pink)
Maybeline Express Finish 40 - clear base coat
Sinful Colours in Rise and Shine (A deep forest green with a slight shimmer running through it)
Barry M Instant Nail Effects - in Gold Foil
A gold striper pen (From Primark)

To create this design start by painting all of your nails
with a clear base coat. This helps to
protect your nails and minimise staining.

Next choose a pale base colour and apply 2 coats to all of your
nails. Make sure to wait a few minutes until they have dried completely, before moving on to the next step. I chose to use a pale pink by Essie in the
colour Fiji. I found that using a pale
colour, really helped to make the design stand out and appear more vibrant.


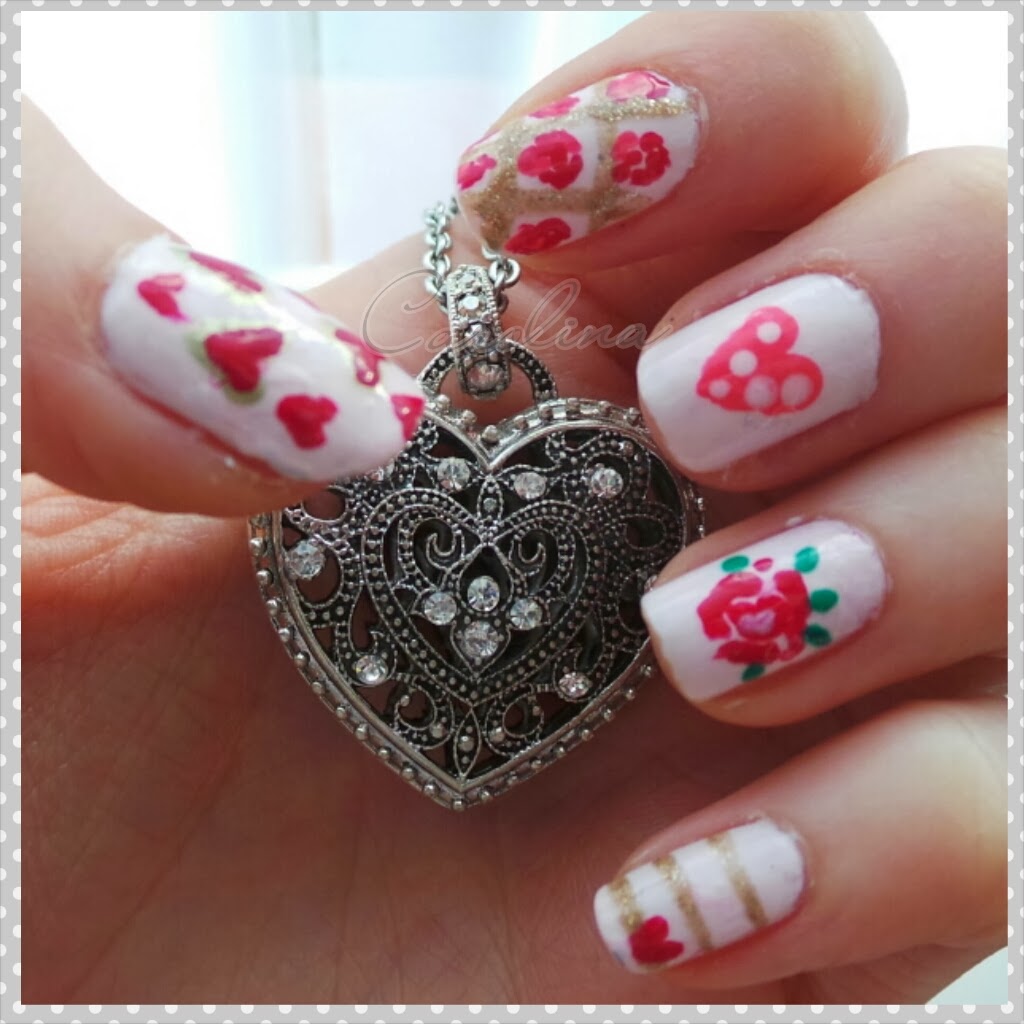
This next step is where all the fun begins! Use a medium
sized dotting tool and a gold nail polish to create two small dots on your thumb nail. Drag the dots in a downward motion and at a
slight diagonal, until they meet in the middle to form a heart shape. Once this
has dried, you can then use the same technique to create smaller pink hearts
inside and in any spaces in between. (Whilst I waited for the
gold to dry, I moved on to the other nails and came back to the thumb at the
end).

(Excuse the nail varnish on my fingers...it can get a bit messy at times!)

On your pointer finger, use a gold striper to paint 4 diagonal lines (2 in one direction and 2 in the other, as illustrated above). Next use a cocktail stick dipped into a colour of your choice, to create small roses. I used Barry M's pomegranate and grapefruit to draw alternating small curved lines, forming little roses in between the gold lines.

On Your middle finger, create one large pink heart in the centre of the nail, using the same technique as that used for the thumb nail(Make 2 dots and drag them down to meet in the middle. The colour I chose to use for the heart was Barry M - Grapefruit. Once the heart has dried you can either leave it plain, or get even more creative and fill the space inside with a pattern. I used a dotting tool to add a few polka dots and create a more eye catching design.

For the ring finger I created a single large rose, using Barry M- Pomegranate. To do this start in the centre of the nail and paint a small,curved line. Following this paint several more curved lines around the centre line. This doesn't have to be too neat, as any irregularities makes for more realistic looking petals.

Finally finish this nail with a scattering of green leaves, painted around the rose. I used Sinful Colours - Rise and Shine.

For the final nail design on your 'pinkie' finger use a striper in the colour of your choice. I used a gold one from Primark, to create 3 horizontal lines.

Finish this off with a little heart in the corner of the 3rd line, again using the same technique as mentioned previously.

And that's it a cute and pretty design, perfect for Valentines day!
I hope you enjoyed reading this post and if anyone does decide to have a go, I would love to see your recreations! Feel free to leave a link below or use the tag #carolinanails1 on instagram.
Bye for now xx
No comments:
Post a Comment